3-2-1 Method St. Louis Style Ribs On Grill
This 3-2-1 method St. Louis-style ribs on grill is one of my favorites. Smoking St. Louis Ribs using the 3-2-1 method is probably one of the best ways to grill ribs.
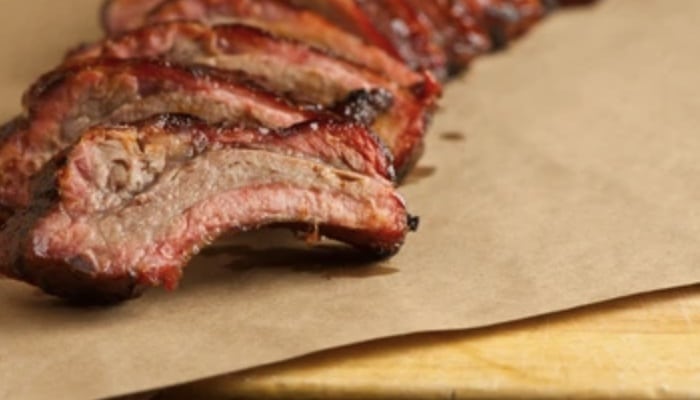
It is easy to do, and the results are always satisfying with the beautiful crust on the meat and the tender texture.
St. Louis-style ribs are fun to work with as they have lean meat and enough fats in them, they come up with a juicy result, and the flavor is amazing along with the right seasoning.
The challenge in cooking with this method is timing and proper heat.
You need to ensure that you have everything ready, and the heat should be consistent during the three major steps.
There are instances where I mess up just one of the three stages, and the whole recipe is ruined.
So you need to treat each step of the process as important as the other steps.
That way, your St. Louis-style ribs will have the best texture and flavor when you cook them.
There are also a lot of ingredients needed to get you the flavors that you want.
So with this guide and recipe, we will be cooking the best St. Louis-style ribs with your grill.
You can cook the St. Louis Style ribs in your oven as well but the one cooked on the grill tastes out of the world.
Try out both ways and do not worry as most of the ingredients to be used are common and you can find them easily.
What Is The 3-2-1 Method?
The 3-2-1 method simply refers to the number of hours that you need to cook the ribs.
Ribs are not the hardest part of the animal, so they cook quickly and dry out.
So what this method does is make sure that the ribs are smoked or cooked at a slow and low temperature.
This, in turn, can make the ribs juicy and tender despite the long cooking process.
The cooking stages are separated into three processes, and the numbers indicate how many hours you should cook them for.
The first stage is where you cook them for 3 hours.
It is just like how you would smoke another cut of meat directly on the grill or smoker.
The only thing you put on the ribs is the seasoning and rubs you need for the taste to develop.
The purpose of this part of the process is to make sure that the meat starts to heat up and the heat gets to the bone.
It starts to melt the tendons as well as get the seasonings deeper.
The second cooking process is where you would wrap the meat in foil to tenderize it even more.
This is where you would also start to incorporate the liquid ingredients, baste, or brines.
This part of the process takes 2 hours to cook, and it makes sure that the meat becomes tender all the way through.
This is a bit challenging to do with bone-in cuts of meat like the ribs.
The third and final cooking stage is where the meat is cooked without the wrap for an hour.
It is where you would glaze the meat with your favorite sauce and make sure that it develops.
Another purpose of this part is to create the perfect crust on the meat.
That way, the ribs will look amazing and the hard tendons or parts of the ribs are completely tenderized.
You can cook this recipe with Baby Back Ribs as well, there is a difference between the St. Louis Ribs and Baby Back Ribs but this recipe works for both.
3-2-1 Method St. Louis-style Ribs Recipe
Ingredients for the recipe
- 1 rack of St. Louis-style Ribs
- 4 tablespoons of butter
- 1 and a half tablespoons of honey
- 1 tablespoon of mustard
- 1 tablespoon of brown sugar
- 1/4 cup of beer, beef broth, or soda.
For The BBQ Rub
- 2 tablespoons of brown sugar
- 1 tablespoon of smoked paprika
- 1 tablespoon of salt
- 2 teaspoons of mustard powder
- 1teaspoon of cinnamon
- Half teaspoon each of cracked pepper, garlic powder, onion powder, and dark chili powder.
For The BBQ Sauce
- 1 cup of diced onions
- 1 garlic clove, minced
- 2 cups of ketchup
- 4 tablespoons of brown sugar
- 2 tablespoons of molasses
- 1 and a half tablespoons of Worcestershire sauce
- 1 tablespoon of butter
- 1 tablespoon of red wine vinegar
- 1 tablespoon of hot honey
- 1 teaspoon of salt
- Half teaspoon each of pepper and smoked paprika
Step 1: Prepare The Seasonings And Sauces
Get a large bowl and then mix all the ingredients of the rub in it. Mix it well with a spoon to get all the ingredients activated and the flavors balanced, especially the sweetness in it.
As for the sauce, get a pan and heat it on the stove over medium heat.
Start by melting the butter and then add the diced onions and garlic and stir them well before seasoning with salt.
Let them cook for at least 10 minutes or until they caramelize and the onions are slightly translucent.
Add the remaining ingredients to the sauce and then stir them well.
Turn the heat down to low and let the sauce simmer for at least 20 minutes.
Stir it frequently so it does not stick to the pan and then let it reduce until it is half the initial volume.
Let the sauce cool down before putting it in a jar or a sealed container to store in the fridge for up to a week.
Step 2: Prepare The Ribs
Leave the St. Louis ribs in the refrigerator for 6 hours or overnight to let them defrost.
Once they are ready, bring them out at least an hour before the actual cooking to clean them.
First, remove the excess fats on the ribs but make sure to leave at least a quarter of an inch thick.
Remove the silver skin or the thick membrane as well before rising the rack of ribs.
You can do this by cutting one corner of the silver skin and then grabbing it with a paper towel.
Pull the membrane and at the same time, guide the knife underneath it to peel it off easier.
Step 3: Preheat Your Grill And Season The Ribs
With this recipe, I prefer using pellet grills or adding wood chips to the coals for the needed smoke.
Heat the grill and then set the temperature to 225 degrees Fahrenheit to preheat.
While waiting for the grill to come up to temperature, lay the rack of ribs on a clean cutting board and then cover it with mustard.
This will be your binder to let the rub stick properly to the meat.
Use all of the rub that you made and then put it on the ribs. Use your hands to massage the herbs and seasonings into the meat and make sure that the rub covers every inch of the meat.
Step 4: Initial Cooking
Once ready, place the rack of ribs directly on the grill grates and let them cook for 2 and a half hours undisturbed.
After 2 and a half hours, check the internal temperature of the ribs.
If it reads 165 degrees Fahrenheit, remove it from the grill and if not, let it cook further for another 30 minutes to let it come up to the right temperature, so that is a total of 3 hours.
Step 5: Second Cooking
Once the ribs reach the desired temperature, carefully remove them from the grill and place them on a flattened aluminum foil.
Cover each side of the ribs with brown sugar, honey, and butter.
Fold the foil and then add the juices of your choice, pour a cup of it on the aluminum foil.
Close and seal the aluminum foil so that the vapor will hardly escape later when cooking.
Place the ribs covered with foil back on the grill and then let it cook for another 2 hours.
Step 6: Final Searing
After two hours, remove the ribs from the grill and get rid of the foil cover.
Brush all the surfaces of the ribs with the bbq sauce that you made and then return it to the grill.
Let it cook for another 1 hour and then insert the meat probe once again.
Glaze the ribs with the BBQ sauce every 30 minutes until it reaches an internal temperature of 190 degrees Fahrenheit.
Step 7: Rest And Serve
Once it comes up to an internal temperature of 190-200 degrees Fahrenheit, remove the rack of ribs from the grill and then wrap it immediately with aluminum foil.
Let it rest for at least 30 minutes before slicing it. Serve with your favorite side dishes while it is still hot!
If you like the post then do not forget to share it on social media!